How to Turn a Slide Deck into an Interactive Lecture
Attention during a straight lecture famously sags after the first ten to fifteen minutes. The fix isn’t better slides — it’s breaking the monologue. An interactive lecture keeps your deck but weaves moments of participation into it, so learners keep doing rather than just watching. Here’s how to convert a deck you already have.
Find your break points
Walk through your slides and mark the natural seams — the end of a concept, a worked example, a claim worth testing. These are your break points: the moments to stop presenting and hand the room back to learners. Aim for one every eight to twelve minutes.
Match the interaction to the moment
Different seams call for different interactions:
- After a new concept — a quick quiz to check it landed.
- After a worked example — a drag-and-drop or a “your turn” task.
- Before a decision or opinion — a discussion or a live poll.
Variety matters as much as frequency; the same interaction every time becomes its own kind of background noise.
Make joining effortless
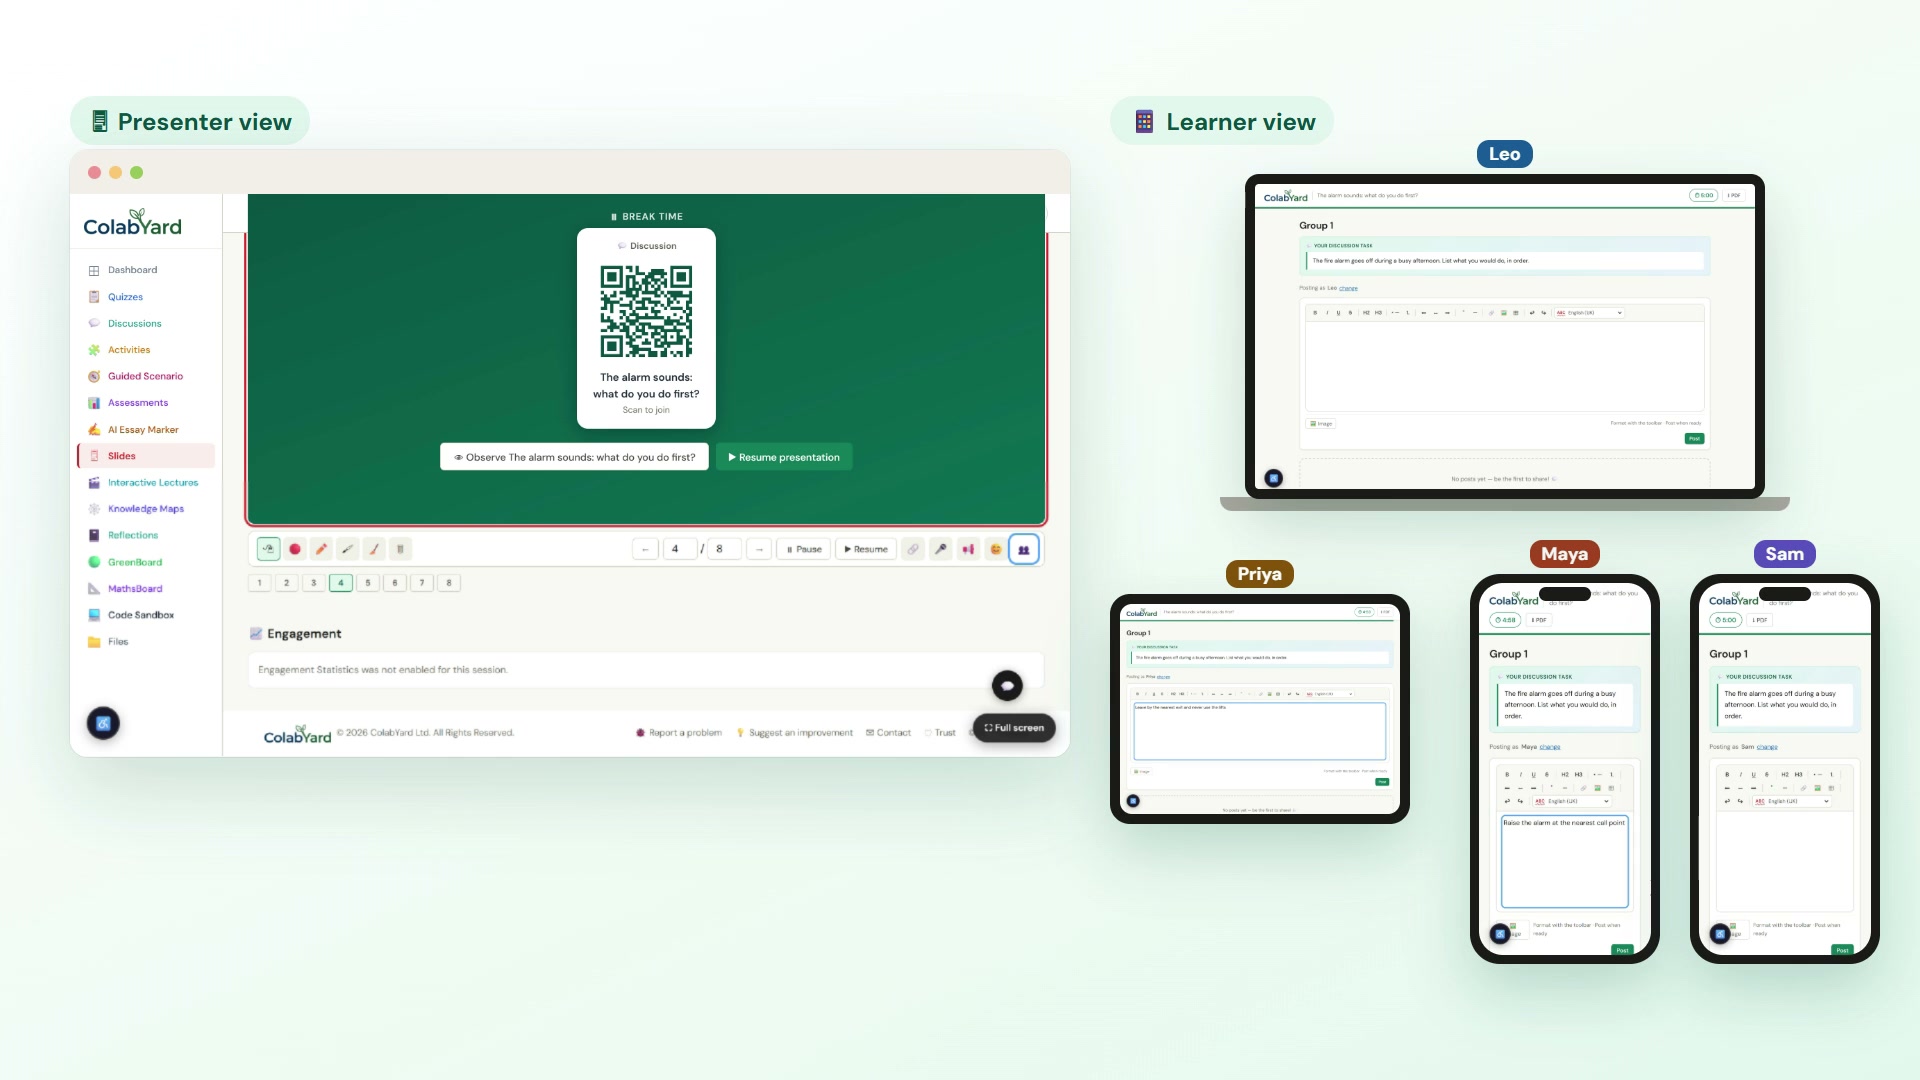
The break only works if learners can act on it instantly. A QR code on the projector that pushes the activity straight to every device — no accounts, no codes to type — keeps the energy from leaking out during the transition.
Use what you learn
The point of a mid-lecture quiz isn’t the score; it’s the steer. If half the room missed a question, that’s your cue to reteach before moving on. An interactive lecture gives you a live readout of understanding instead of a hopeful guess.
Close each loop before the next slide
Don’t let a break dangle. Surface a couple of answers, react to them, resolve the point — then move on. That rhythm of present → participate → resolve is what keeps a long session feeling alive.
A worked example: one 50-minute lecture
Here is what the conversion looks like for an ordinary deck of about thirty slides:
| Time | What happens | Why |
|---|---|---|
| 0–3 min | Three-question quiz on last week | Retrieval, and it settles the room |
| 3–14 min | Slides 1–9: the first concept | Input |
| 14–17 min | Checkpoint question on the slide | Did it land? Reteach if not |
| 17–28 min | Slides 10–19: worked example | Input |
| 28–34 min | Sequencing activity: redo the method | Learners use it themselves |
| 34–42 min | Slides 20–27: where it gets contested | Input |
| 42–48 min | Group discussion: take a position | Apply and argue |
| 48–50 min | Reflection: one thing learned, one question | Closes the loop; tells you what to revisit |
The same thirty slides, about fifteen minutes less talking, and four points where you find out what the room actually understood. Nothing was cut that learners would have remembered anyway.
Small checks without leaving the slide
Not every break needs to be a full activity. A single multiple-choice question that appears over the slide on each learner’s device takes under a minute and tells you whether to go on or go back. Use these often and save the bigger activities for the two or three moments that matter most. If you’re drafting questions from the deck itself, check each one against the slide it sits on — a question about slide 12 should be answerable from slides 1–12.
When a check goes badly
Sooner or later, two-thirds of the room will get a question wrong. That is the tool working, not the lecture failing. Three moves, in order:
- Don’t give the answer yet. Ask learners to convince a neighbour, then ask again. Often the room corrects itself, and that sticks better than being told.
- Explain it a different way. Repeating the same explanation louder rarely helps. Use another example, a diagram, or the wrong answer itself: “here’s why this one is tempting”.
- Drop something later. Have one section of the deck you’re willing to skip. Building the next idea on a concept half the room missed costs far more than losing five slides.
End with a reflection, not a summary slide
A summary slide is you remembering the lecture. A two-minute reflection is the learners remembering it. Ask what they learned, what they’re still unsure about, and how they’ll use it — the answers show you exactly where to start next time.
Mistakes to avoid
- Interaction as decoration. A poll that changes nothing about what you do next is a break, not a check.
- Too many, too small. A question every two slides is as wearing as none at all.
- Leaving it all to the end. By then it’s too late to fix what was missed in minute ten.
- Not budgeting the time. Each break costs three to six minutes. Cut slides to pay for them.
ColabYard’s interactive lecture lets you drop break points into a slide deck and launch a quiz, activity, or discussion at each one — the QR appears on the projector while a tap-to-join card reaches every learner device.
Frequently asked questions
What is an interactive lecture?
A lecture in which the presenter pauses at planned points for learners to do something: answer a question, complete a short activity or discuss in groups. The slides and the content stay; the difference is that learners take part every ten minutes or so and the lecturer finds out what has been understood.
How often should I add an activity to a lecture?
Roughly every eight to twelve minutes, at the natural end of a concept or a worked example. Vary the type: a quick question after new content, an activity after a worked example, a discussion where there is something to argue about.
Do I have to rebuild my slides?
No. Keep the deck you have and add break points between slides. In ColabYard you upload the deck as a PDF or PowerPoint file and attach a quiz, activity or discussion to the slide where you want the pause.
Does interactivity work in a large lecture theatre?
Yes, and it matters more there, because a large room is where it is easiest to drift. Learners answer on their own phones, so two hundred people can respond as easily as twenty, and you see the spread of answers at once.
Watch it in action
Try it with your own learners
ColabYard is free for trainers. No student accounts needed — just a QR code.
Get started free →